Adding RGB to a 6 year old PC in a 16 year old case!
This project was something to get my oldest daughter interested in building PC's. She got a bit interested when she saw me looking at parts to upgrade to a new machine; my current PC was built only a few months after she was born.
She got interested in the cases, specifically the ones where the pictures had glorious RGB set to "Unicorn Barf" mode. She immediately asked if my new machine could look like that and suffice it to say I'll be spending some extra money on RGB parts and a case to help show it off.
When she found out that my current computer would be setup so she and my wife could have a place to play, she asked if we could make it have unicorn barf as well.
Since I still had an old original Antec LANboy windowed case laying around upstairs, I decided to buy some cheap RGB parts and move my current machine into that case with all the new fancy LED's, provided that she would help me do it.
To my joy, she was super excited to do it and so we had our own special Daddy-Daughter PC project.
My parts arrived the next day, on Sunday no less, so we immediately got to work around 11AM. My youngest wanted to hang around as well, so we took a group shot.

First I wanted to see if I could salvage an old power supply out of a very old PC that we had used as a HTPC, which needed to move out of our entertainment center anyway. Sadly it wasn't going to work with my existing build, but my daughter did enjoy taking all the parts out of it to be recycled. Nothing needed to be saved so she got to pull lots of parts out and was excited.


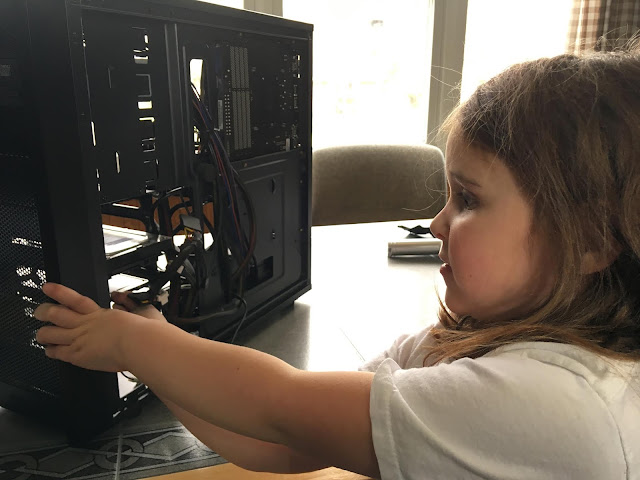
Next was complete disassembly of my existing machine. True to its era, it was built into an Antec One case. Here is my daughter using it to play some Minecraft.

Here is how it looked with both panels off, it wasn't perfect cable management, but it was pretty clean and allowed for good airflow.

2013 Build Specs:
Intel i5-4570
16Gb DDR3 RAM
GTX 760
120GB SATA 6G SSD
1TB HDD
512GB SATA 6G SSD (added this XMas from a friend so my games don't take forever to load anymore).
As we were removing parts I decided to start cleaning up the old Lanboy dust wise and I started mounting the hard drives to the removable drive cage. Yes kids, back in 2003, removable drive cages were an amazing luxury for system building. Compare this with the Antec One from 2013 and it's tool free drive sleds that mount from the opposite side panel and I was starting to appreciate how much cases advanced over time.
And then the Lanboy really started to show its age.
You see my system has two SSD's and one HDD. Not bad for a six year old computer, and while the Lanboy has space to the drives, it doesn't necessarily have space for the drives AND my massive video card.
I spent no less than an hour trying to tetris my way into fitting things properly. Unfortunately the top most drive bays on the tray require the HDD to be further forward, because, um...well...
You see kids, back in the day we used to have 3.5" drive bays that would stick out to the front of the case. For floppy disk drives, ZIP drives, or if we got fancy in early 2003, a SD card reader.
Sadly, the covers for the 3.5" drive bays on the front of the case wouldn't let the HDD mount properly and I couldn't squeeze in my massive GeForce GTX 760 and the drive.
In the end, I installed my SDD drives and then used only two screws (with rubber grommets at least) to secure the HDD at the top of the drive tray. Luckily the drive doesn't really travel and is secure enough.
So I finally got everything mounted in the case, but nothing was cabled up.

And here is where the Lanboy started to show its old age even more.
The other side panel does not come off at all and there is almost no where to easily do any cable management. This is when the nightmares of my old non-LED lit build from 16 years ago came back to haunt me.
Still, I managed then and I managed now; it was just...painful. Even simple things like inserting the power supply was a strain. I did the best I could, there aren't any cable tubes or sleeves that I had lying around, but I did manage to use cable ties and some double sided tape as needed to hide just about everything I could.
In the end I think it looked pretty good.

It was even better once I powered it on and the light show started. Everything booted up and was working fine too.


Conclusion
An old PC into an even older case was an odd build, but my daughter loves it and we had fun building it together.
The LED's aren't really controllable, well the two 80mm (yes, that's right this case only has 80mm fan mounts!) are set to permanent unicorn barf mode, but I technically have a small remote to control the LED strips.
Building the new machine will be a cakewalk in comparison. I'm looking at a Corsair cube case, though I've not 100% settled on it yet. I'm waiting for the Ryzen 3000 series to get released before I pull the trigger, and man waiting for that is hard. My daughter is already excited to help with that too, which makes it even better. The only downside is that all the extra RGB stuff adds a bit to the overall cost, but my daughter is worth it and if I'm honest I like it too.
She got interested in the cases, specifically the ones where the pictures had glorious RGB set to "Unicorn Barf" mode. She immediately asked if my new machine could look like that and suffice it to say I'll be spending some extra money on RGB parts and a case to help show it off.
When she found out that my current computer would be setup so she and my wife could have a place to play, she asked if we could make it have unicorn barf as well.
Since I still had an old original Antec LANboy windowed case laying around upstairs, I decided to buy some cheap RGB parts and move my current machine into that case with all the new fancy LED's, provided that she would help me do it.
To my joy, she was super excited to do it and so we had our own special Daddy-Daughter PC project.
My parts arrived the next day, on Sunday no less, so we immediately got to work around 11AM. My youngest wanted to hang around as well, so we took a group shot.

First I wanted to see if I could salvage an old power supply out of a very old PC that we had used as a HTPC, which needed to move out of our entertainment center anyway. Sadly it wasn't going to work with my existing build, but my daughter did enjoy taking all the parts out of it to be recycled. Nothing needed to be saved so she got to pull lots of parts out and was excited.


Next was complete disassembly of my existing machine. True to its era, it was built into an Antec One case. Here is my daughter using it to play some Minecraft.

Here is how it looked with both panels off, it wasn't perfect cable management, but it was pretty clean and allowed for good airflow.

2013 Build Specs:
Intel i5-4570
16Gb DDR3 RAM
GTX 760
120GB SATA 6G SSD
1TB HDD
512GB SATA 6G SSD (added this XMas from a friend so my games don't take forever to load anymore).

As we were removing parts I decided to start cleaning up the old Lanboy dust wise and I started mounting the hard drives to the removable drive cage. Yes kids, back in 2003, removable drive cages were an amazing luxury for system building. Compare this with the Antec One from 2013 and it's tool free drive sleds that mount from the opposite side panel and I was starting to appreciate how much cases advanced over time.
And then the Lanboy really started to show its age.
You see my system has two SSD's and one HDD. Not bad for a six year old computer, and while the Lanboy has space to the drives, it doesn't necessarily have space for the drives AND my massive video card.
I spent no less than an hour trying to tetris my way into fitting things properly. Unfortunately the top most drive bays on the tray require the HDD to be further forward, because, um...well...
You see kids, back in the day we used to have 3.5" drive bays that would stick out to the front of the case. For floppy disk drives, ZIP drives, or if we got fancy in early 2003, a SD card reader.
Sadly, the covers for the 3.5" drive bays on the front of the case wouldn't let the HDD mount properly and I couldn't squeeze in my massive GeForce GTX 760 and the drive.
In the end, I installed my SDD drives and then used only two screws (with rubber grommets at least) to secure the HDD at the top of the drive tray. Luckily the drive doesn't really travel and is secure enough.
So I finally got everything mounted in the case, but nothing was cabled up.

And here is where the Lanboy started to show its old age even more.
The other side panel does not come off at all and there is almost no where to easily do any cable management. This is when the nightmares of my old non-LED lit build from 16 years ago came back to haunt me.
Still, I managed then and I managed now; it was just...painful. Even simple things like inserting the power supply was a strain. I did the best I could, there aren't any cable tubes or sleeves that I had lying around, but I did manage to use cable ties and some double sided tape as needed to hide just about everything I could.
In the end I think it looked pretty good.

It was even better once I powered it on and the light show started. Everything booted up and was working fine too.

Front shot, you can also see my other very old Antec case which houses my server.


An old PC into an even older case was an odd build, but my daughter loves it and we had fun building it together.
The LED's aren't really controllable, well the two 80mm (yes, that's right this case only has 80mm fan mounts!) are set to permanent unicorn barf mode, but I technically have a small remote to control the LED strips.
Building the new machine will be a cakewalk in comparison. I'm looking at a Corsair cube case, though I've not 100% settled on it yet. I'm waiting for the Ryzen 3000 series to get released before I pull the trigger, and man waiting for that is hard. My daughter is already excited to help with that too, which makes it even better. The only downside is that all the extra RGB stuff adds a bit to the overall cost, but my daughter is worth it and if I'm honest I like it too.

Comments
Post a Comment